
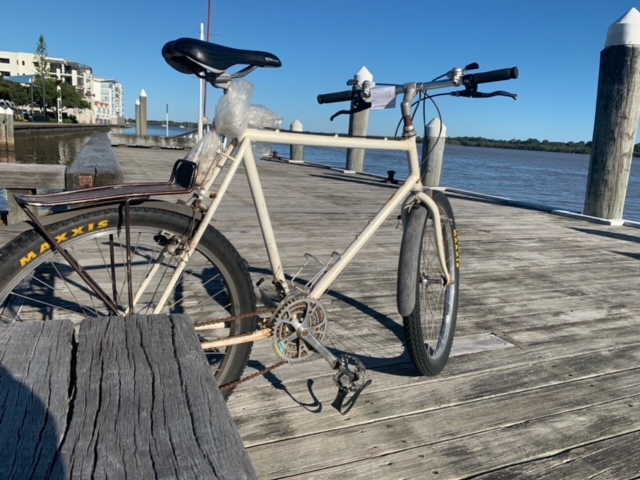
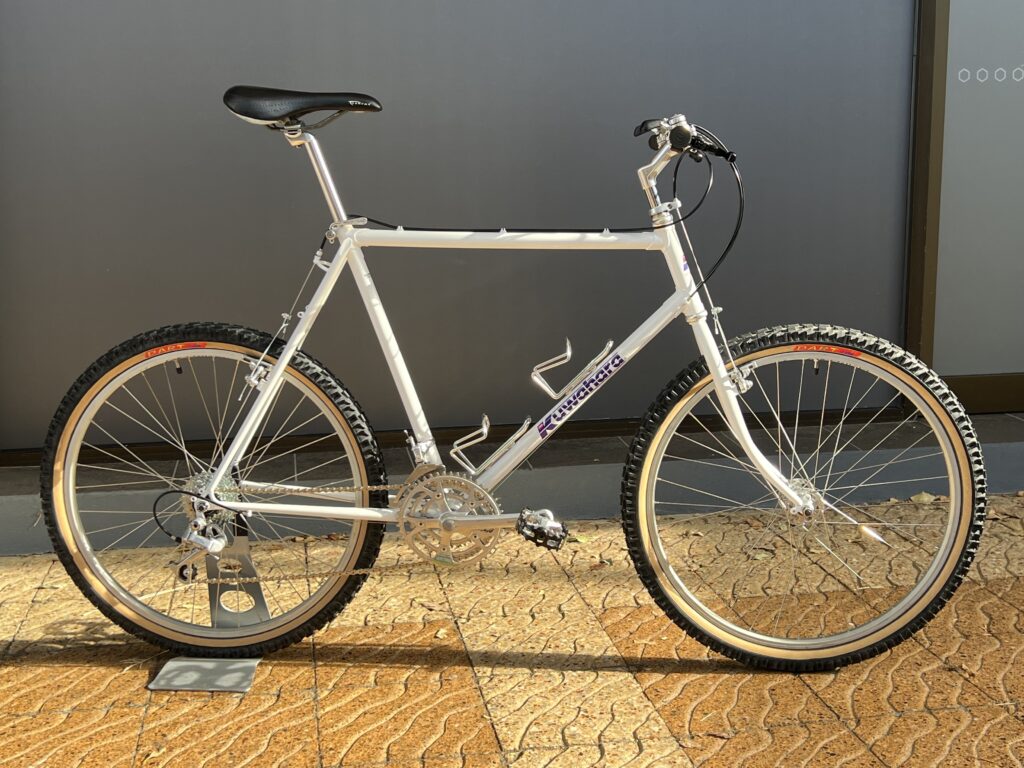
In 1987, Andrew bought a Kuwahara mountain bike to go bicycle touring with his girlfriend.
Many years, adventures and another continent later, he’d married the girlfriend, emigrated, started a business, had a family and thrashed the bike every day commuting, riding with the kids, doing the shopping and still the odd back road ramble.
As the bike slowly wore down to it’s composite atoms, he’d started riding a bike he’d bought for his son to ride to school, “They only ride till they get a license!”
So, he asked me if I’d be interested in restoring the bike that had been part of his life for almost 40 years.
Of course we can, as long as you’re not in a hurry and are prepared to spend a bit of money to replace all the bits that have passed the point of no return. “Well I’d like it restored, but I don’t want to spend a fortune on a bike I will probably hang on the wall and maybe ride now and then.” No problem, Andrew.
“What I really want is the exact same decals as the original bike and make it was like in this old photograph?” Well, I’ll do the best I can.
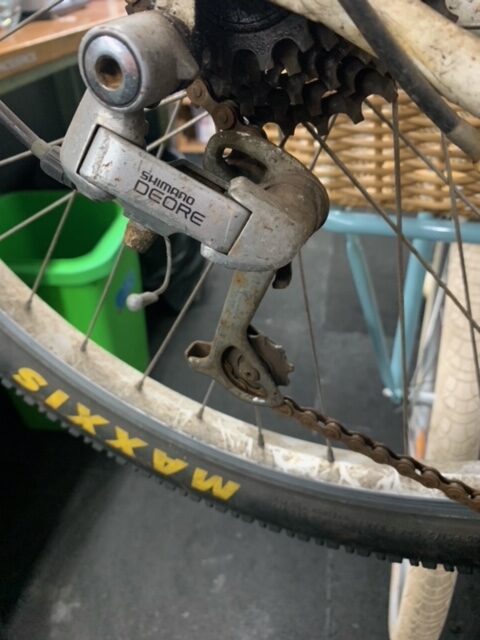
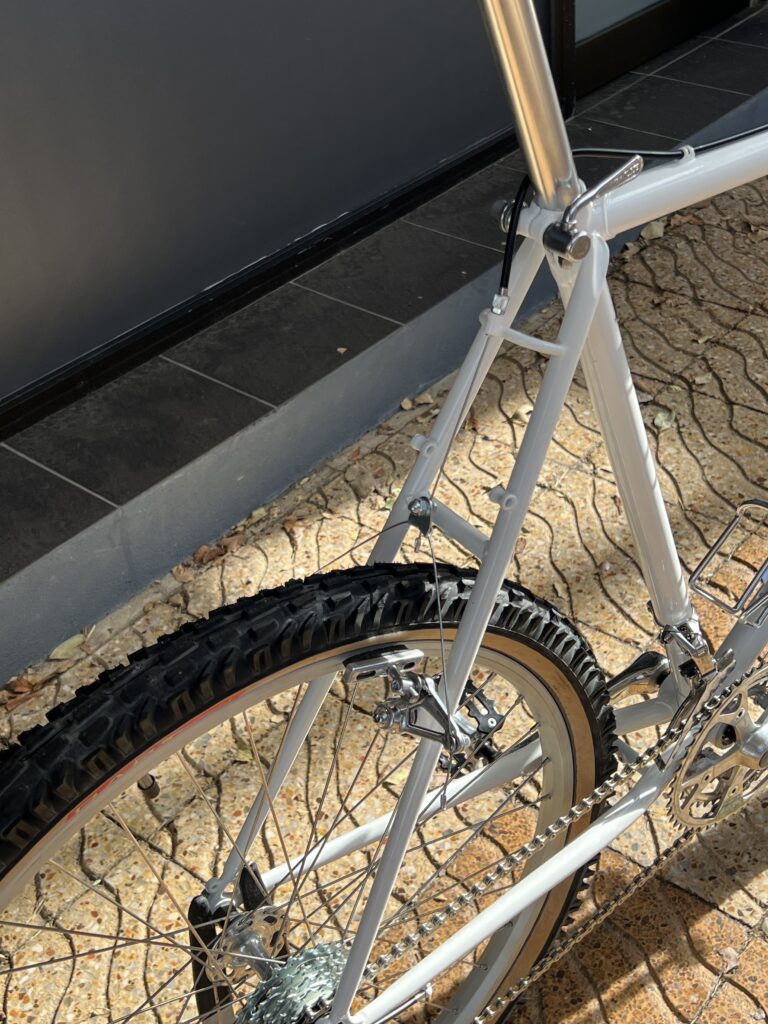
As you can see from the following photos that is was still mostly original, cantilever brakes hadn’t been swapped out for V-Brakes, no Tourney trigger shifters, just all old tired and dirty; not like caked-on-filth dirty, but the hard-to-get-to bits were going to need a lot of work.


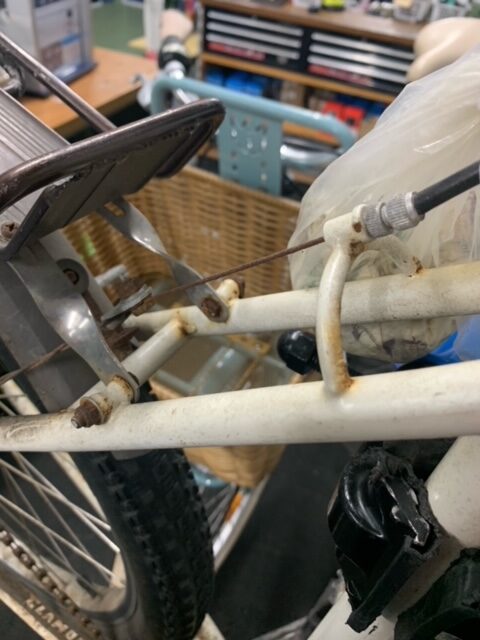
So, I stripped the bike back to just a frame and fork and packaged up all the bits to see what could be salvaged, cleaned, refurbished or otherwise resurrected later.
Then we sent the frame off the be sandblasted and primed so we could see what state it was in. Priming the frame after blasting stops it going instantly rusty in this coastal environment, but also shows you every defect in the metalwork. If you then give it a light sand every little dent and dimple will become immediately obvious. Sometimes just sanding the primer down to the level of the dimples, is enough, sometimes you have to fill dents with some Knead-It® and get into some more energetic sanding.
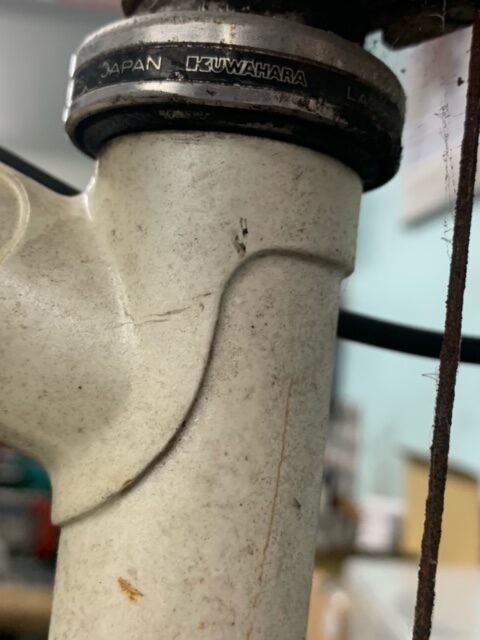
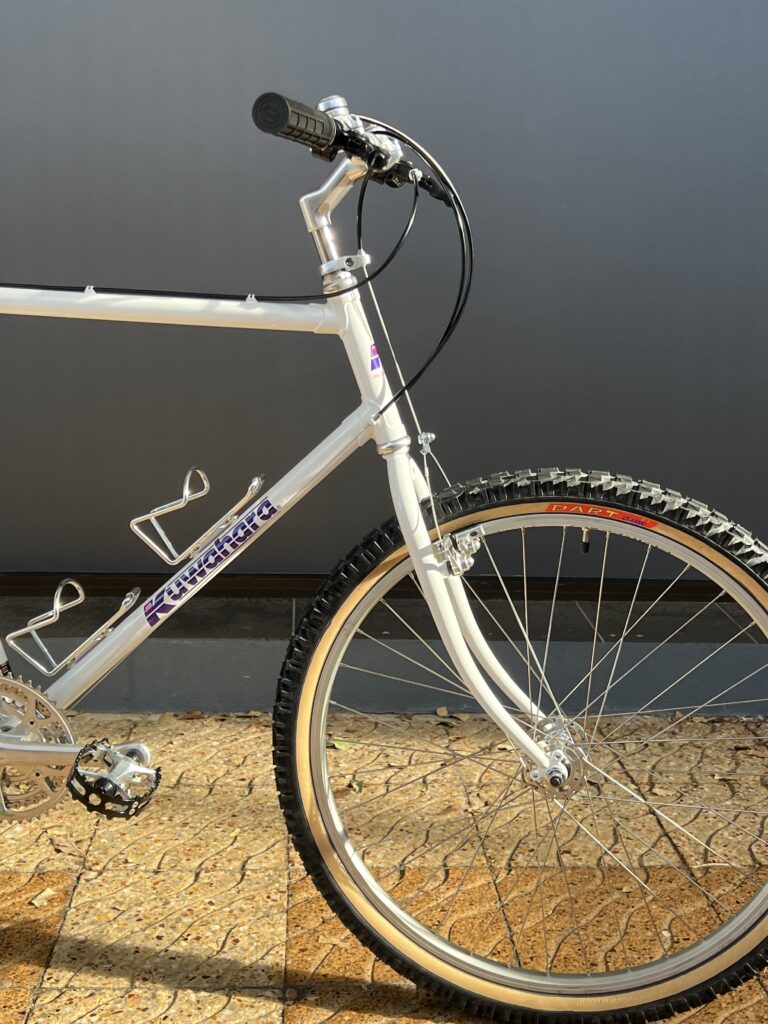
Once we were happy with the frame, we had it painted in a gloss ivory – every so slightly not quite white that will still look white in 10 years if you haven’t been religiously cleaning it.
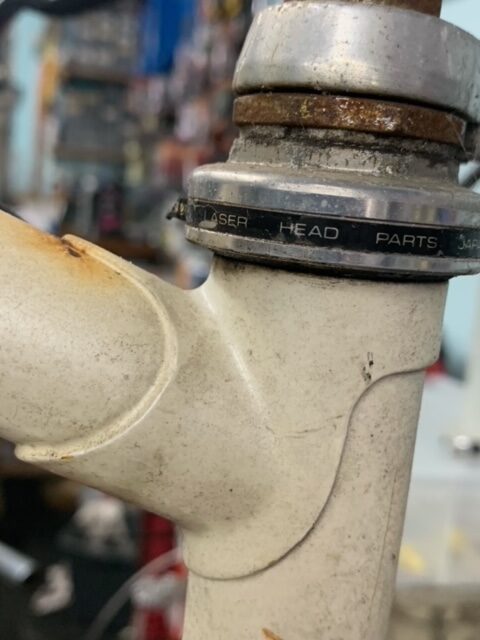
The decals were next. Who knew what a minefield this was going to be. Decals are usually pretty straightforward, find a supplier, choose a decal set, pay your money and in due course they turn up. For Kuwahara decals there is a well established vendor who makes very good decals (mostly for Kuwahara BMX) and it turns out that he’s so good and so popular, that his decal sets are offered by a number of bogus vendors using his artwork and very convincing websites to scam anyone who has searched for Kuwahara decals on Google.
So after two sets of bogus decals that never arrived I went on the Kuwahara Facebook group Kuwahara BMX and asked the group where I could buy them and actually get them, which fairly set the cat amongst the pigeons. I did finally end up with a set and if you’re looking for some Kuwahara decals, I would recommend contacting James at Vintage Steel BMX first, last and always, because 1. you’ll actually get them, and 2. they’ll be First Class. Thank you James.
For most road bike decals I go to Cyclomondo, he has good quality decals, he’s local (Coffs Harbour) and he’s quick. He will also make new decals if you have good quality images, but he’s strictly road bike.
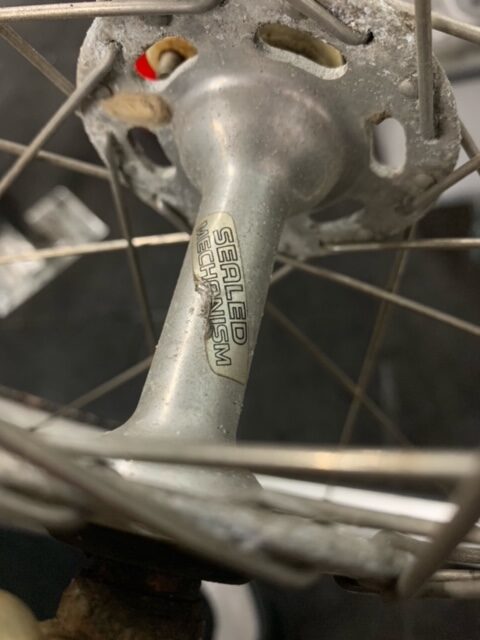
Now we had a frame and fork and a bunch of decals that we put together with a new sealed bearing bottom bracket – I know it’s not really in the spirit of restoration, but the old cups were pretty badly worn and it wasn’t possible to get the bottom bracket snug and still able to turn freely. As the brief was, “Restored, but don’t get carried away,” we compromised with a new VP Components sealed cartridge.
I tried to clean up the original headset, but that was also past its use-by date. I found a vintage Kuwahara headset that I thought would be perfect and it cleaned up nicely, but didn’t have the same diameter cups as the frame – bugga! So, now something half-decent, consistent with the theme, but not extravagant. I have just the thing; a decent Tange headset with a chrome finish. Then the fork was in.
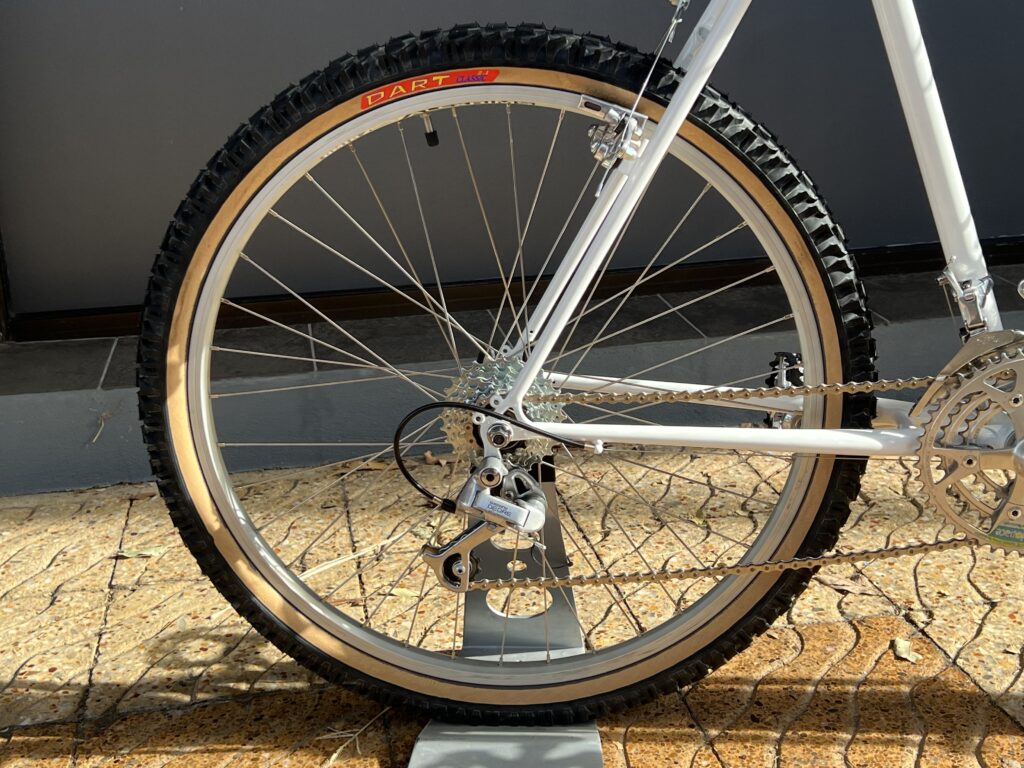
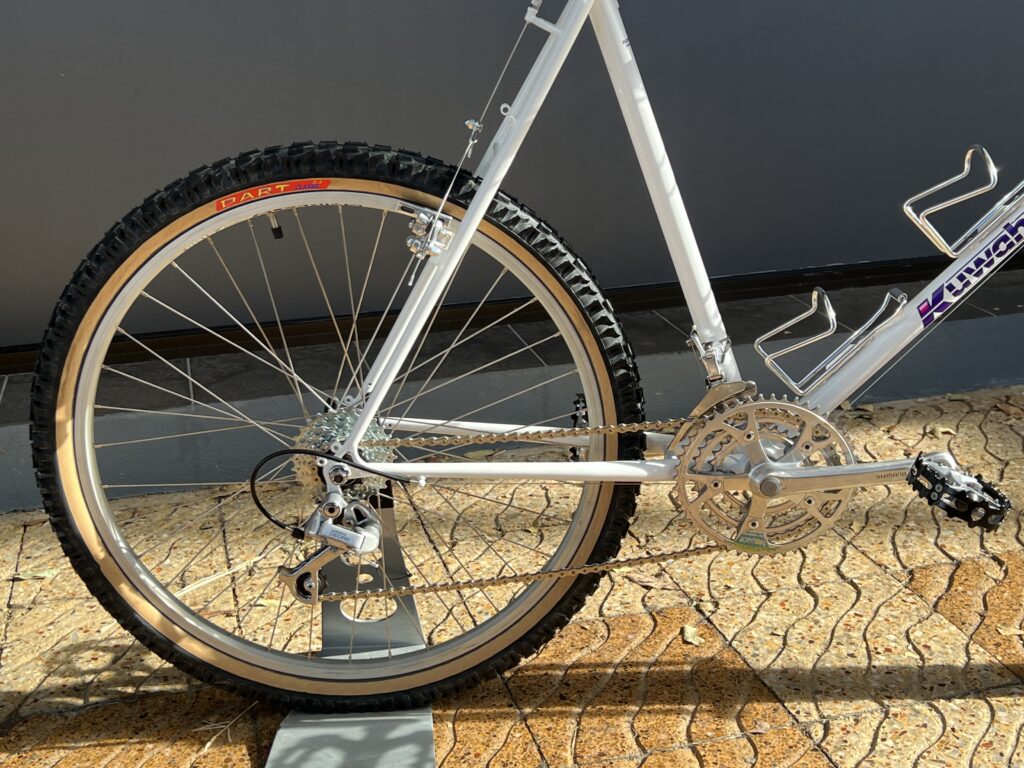
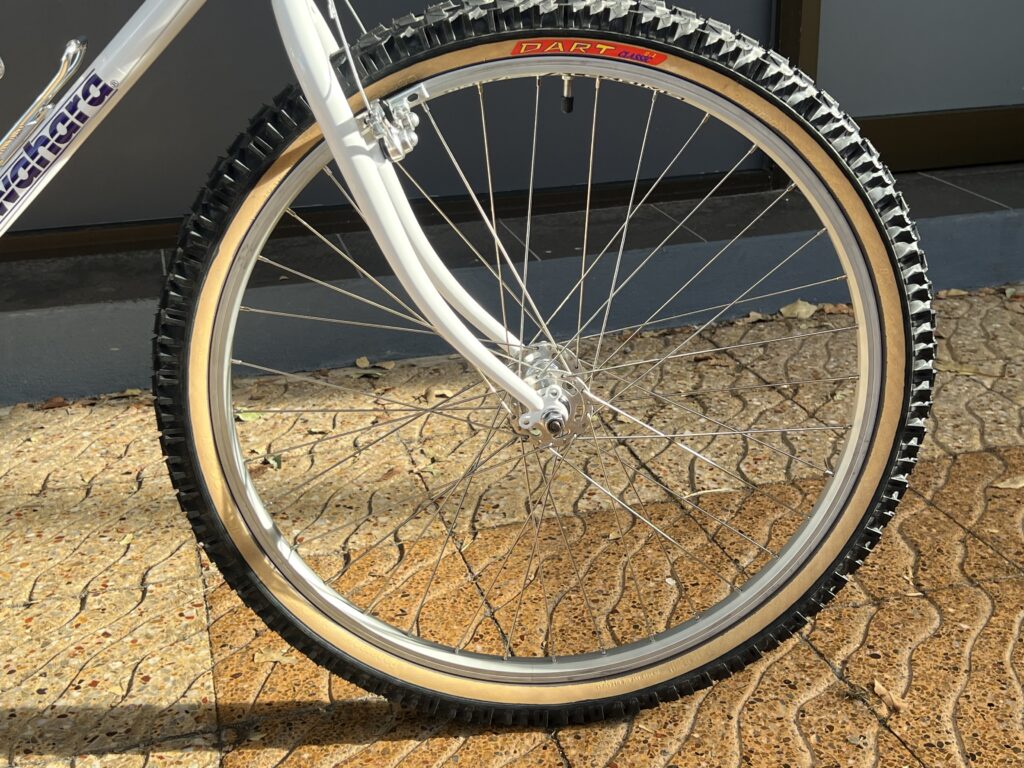
Of the other parts, the wheels were obviously in pretty poor condition, braking surfaces worn down and a multitube of cracks around the the spoke holes from stress over time, repeated truing and so on. We decided to strip the wheels, and re-lace the hubs into some new Alex Rims with the same profile, although these would be double-walled, so won’t need to be trued any time soon. While waiting for the rims to show, we stripped, cleaned and polished the hubs, rebuilt them and laced them into the new rims with stainless steel spokes.
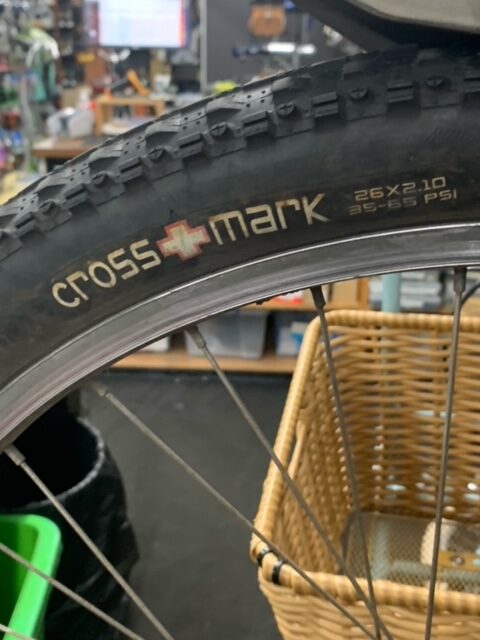
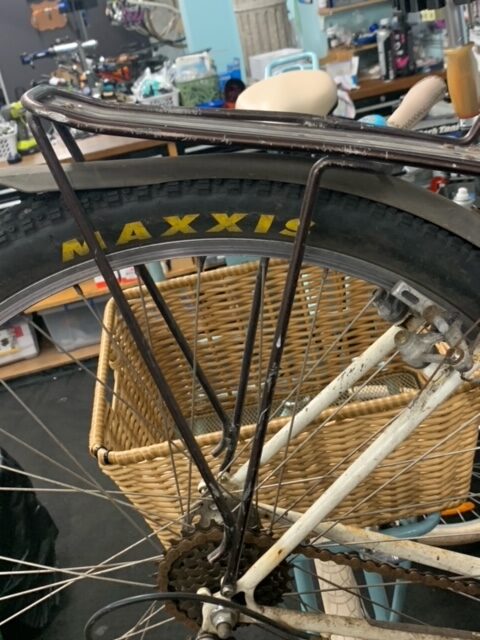
But what about the tyres? Andrew had been running some Maxxis Crossmarks, but they weren’t going to cut it on a restoration, so we starting looking for something that would look the part, even if we couldn’t find anything of the actual vintage. Enter the Panaracer Dart! Allegedly Panaracer have been making these since before Dunlop (I can’t back that up!), but these seem to be an ongoing production line for retro builds, that maintain the aesthetic while still being new. Of course nothing that fits the bill so well was ever going to be cheap, and of course only available in the USA, so postage was going to make them even less cheap. Still, it had to be done – save on this, splurge on that. A pair of Panaracer Dart tanwall 26 x 2.1″ MTB tyres please.
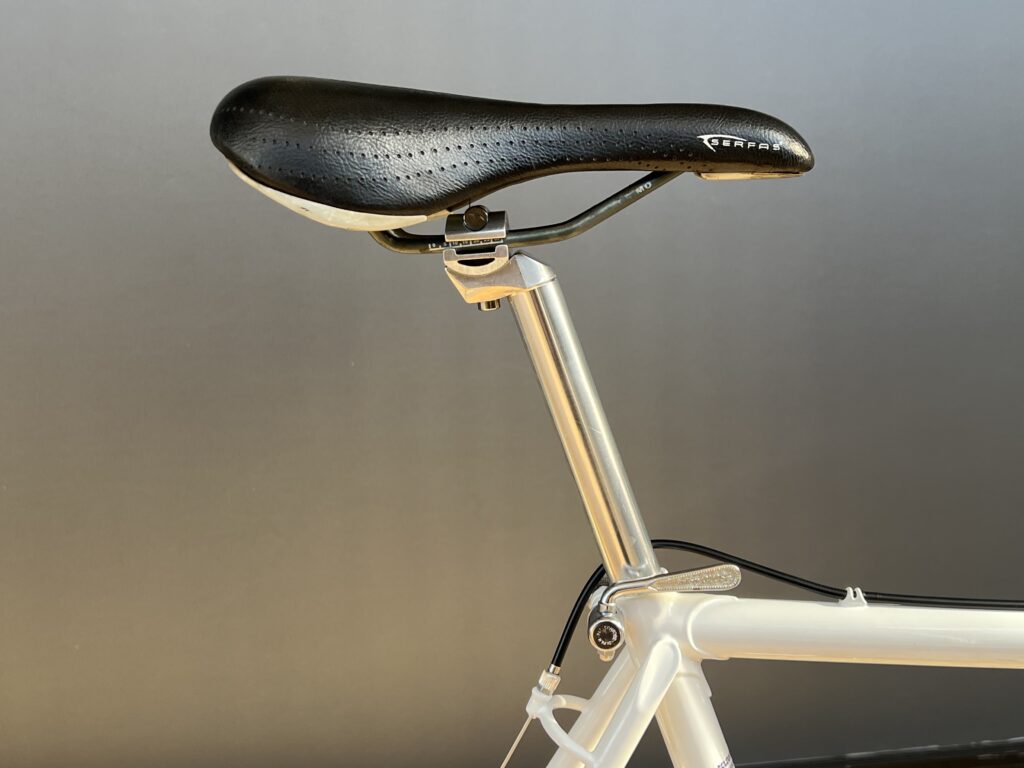
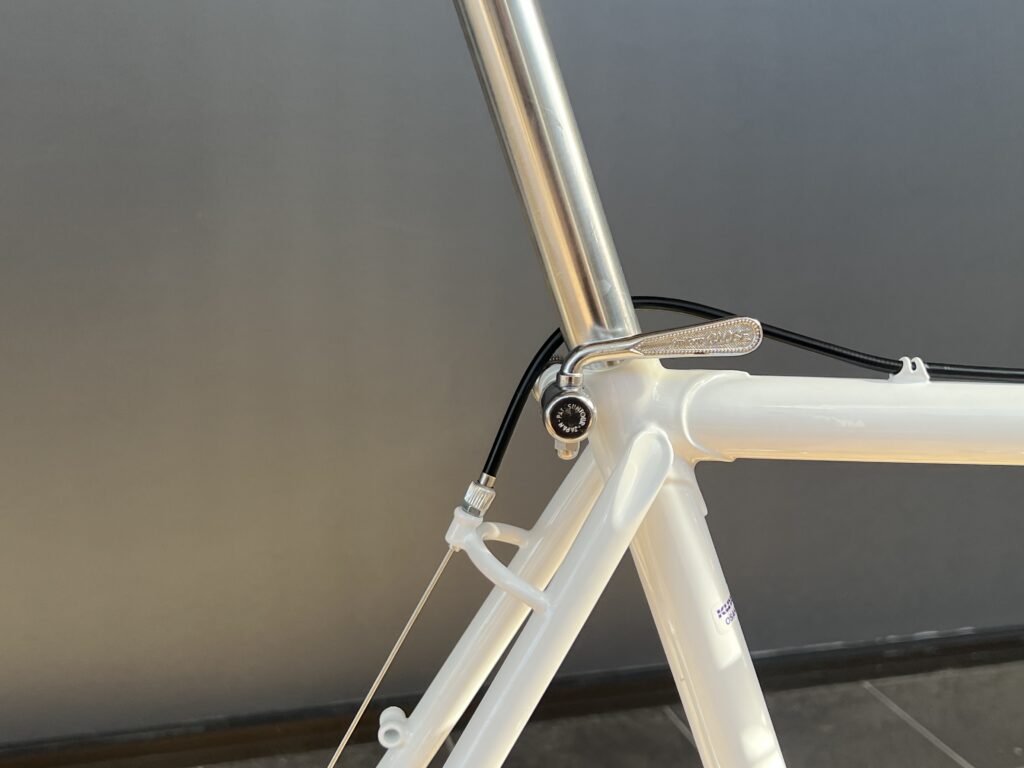
So, fork, bottom bracket and wheels and it suddenly starts to look like a bike again. But, the rest of it wasn’t going to be as easy. While there wasn’t going to endless trips to the metal plater, everything was going to needs hours on the polisher, or just good old-fashioned elbow grease. I really wanted to get a seatpost in the frame so I had something to grab it by without risking the decals or paintwork. The original old SR seatpost we tried polishing, but the alloy just would come up and there were some really deep gouges in it from the seat tube and clamp. If I polished those out the seatpost would end up thinner than the seat tube! We called it quits on that one and started looking for something else.
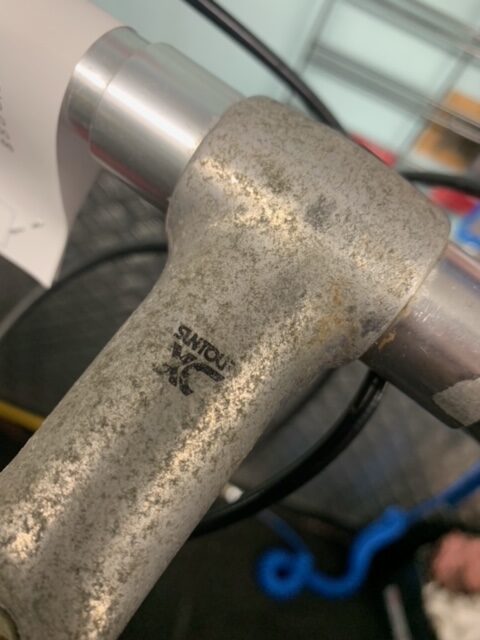
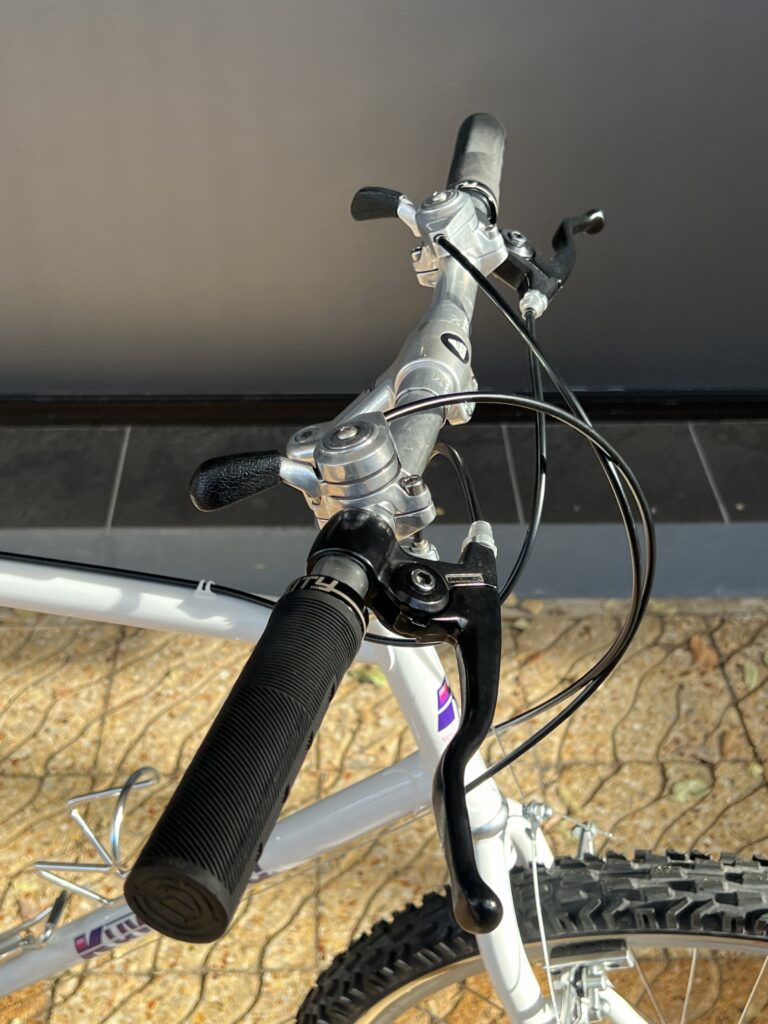
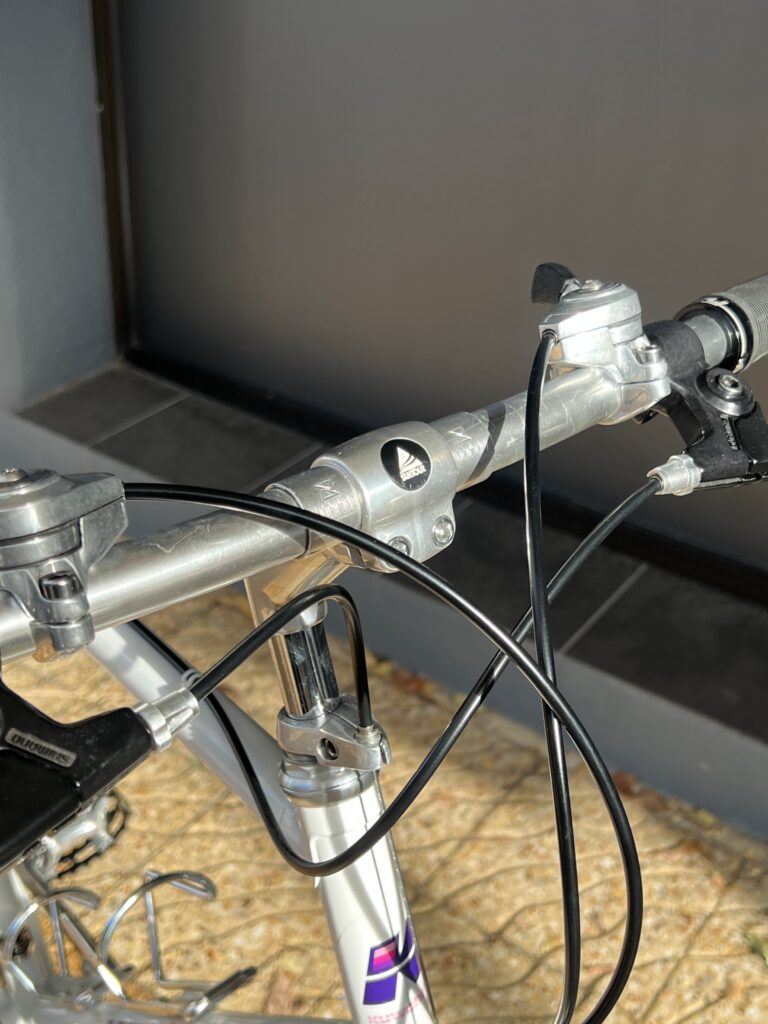
Well, while we were thinking about that, I started on the quill stem. What was once a very nice Suntour XC stem turned out to have an alloy head, but a steel shaft (that went into the steerer) and while not a good combination at the best of times, the alloy had oxidised pretty badly, but might have polished up, but the steel part was very heavily corroded, all the chrome had gone and it was deeply pitted. A nice patina of antiquity, but would look really ugly when everything else was shiny!
Time to go shopping. Let’s see what’s out there. Plenty of seatposts, not much better than we’ve got. Stems, lo and behold, an exact match, NOS (New Old Stock), never been in a bike – pristine, not a scratch on it. But, more than we’d budgeted for both stem and seatpost. Tough decision time. I decided to buy the lovely stem, because that’s the bit you can see while you’re riding and that bit is unique to the bike. Seatposts are a dime-a-dozen and you can always buy one later. Honestly, a modern alloy mircro-adjust seatpost with a high polish finish will look better than the original and match the “shiny” of the rest of the build. Done. Or as Rhys would say, “Boom.”
So, generic alloy seatpost, check. Seatpost clamp ….. another crusty thing beyond salvage. Options, nothing, nothing, some alloy thing from about a generation later, ugly, not happy, still looking, gave up, went onto something else, kept looking and then one day, up it pops on Retro Cycling Marketplace Australia. The exact same clamp, just in much, much better condition – well worth a year of looking I’d say!
So, seatpost in place, cleaned up the original saddle, or at least the one he rode in o! Fitted that, fitted the lovely new stem – after a bit of ogling and passing around and generally basking in it’s magnificence, not to mention pristine rarity! Stuck that into the steerer and almost immediately realised that it needed to come back out to accommodate the cable guide for the front cantilever brake. A few hours later … and a lot of cleaning and polishing to the nth degree, the cable stop and the stem were in. Clean up the original bars – the bit of the whole bike that needed the least work. OK now we’re “cooking with gas” (probably can’t say that for much longer …), got a saddle and handlebars, the rest should be pretty straightforward, right?
Well, what do I tackle next? There are no easy jobs left, brakes or gears, brakes or gears, brakes or gears, OK, let’s have a crack at the brakes.
It reminds me of a time when two girls asked me out at the same time … it wouldn’t matter which one you chose, it would end up being the wrong decision, but that’s a story for another day.
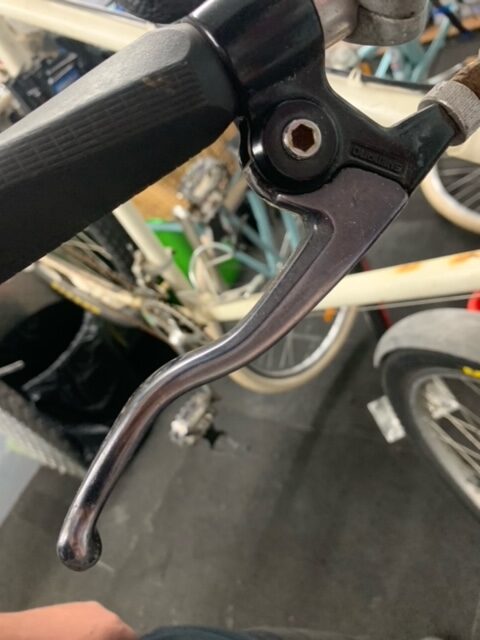
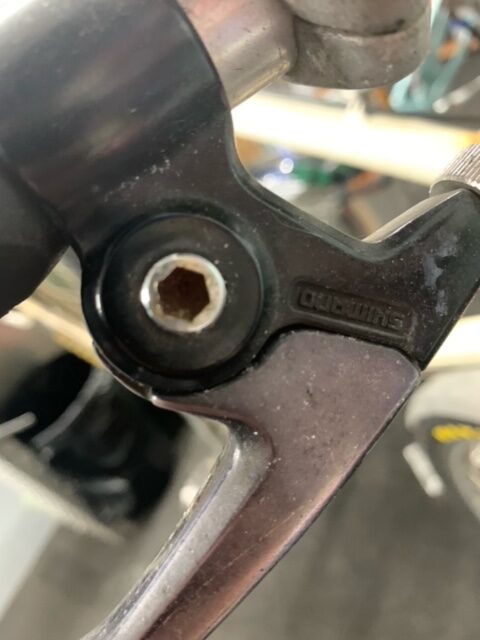
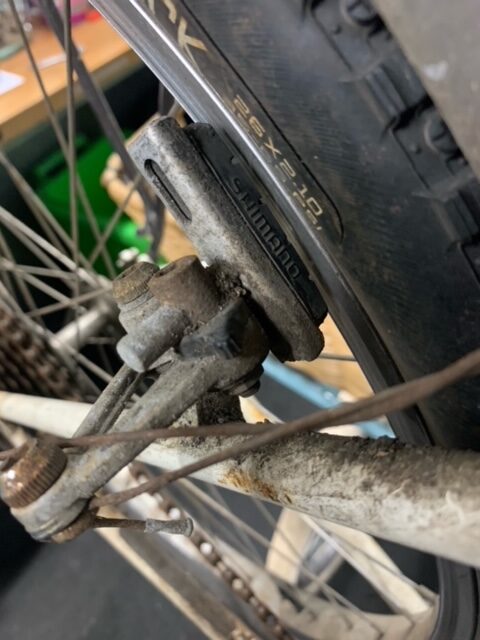
Brakes. How hard can it be? Pull the levers apart, in good condition, just not black anymore and looking a bit weary. I might just strip those puppies down and get them powdercoated. Meanwhile, lets have a look at the calipers. Cantilever brakes have gotten a pretty bad rap over the years, mainly for less-then-ideal stopping power. I freely admit that there are many more recent brake innovations that put cantilever brakes in the shade, but in all honesty, they aren’t that bad if they are set up properly – and therein lies the rub; they are not easy to set up.
However, they do look super cool, not quite Campagnolo Delta cool, bit at least Shimano AX600 cool!
I was determined the get these cantis back into peak condition. Down to their composite parts, endless hours of polishing, time to bring in the Dremel® and before long (not counting the endless hours), the parts started to look like new again. Possibly better than they looked new. Fortunately no pesky labels or decals to polish around.
The levers came back and I put them together and on the bars (I did this first because I thought putting the calipers back on would be easy and I’d be running cables by lunchtime – oh how I admire my optimism sometimes!). I put the front calipers together, springs, little plastic bushes, etc. pushed them onto the posts, spring in middle position, finally worked out how the brake pad went back in, put the yoke cable over it, ran a cable from the lever to the straddle and hey presto!
Doesn’t work. Each side returns differently, calipers won’t centre, not to mention pads relative to rim. Hmmmmmm. OK so why won’t the calipers return to the open position? Maybe the springs need to be in a different position. Sort of, but not really. Maybe new springs. Slightly better. Is the bolt too tight. Apparently, yes. Am I missing a spacer somewhere. Maybe, but no unused parts in the box. Let’s manufacture one (or a pair) and see if that helps. Nope. Hmmmmm. Well I have other things I need to do this week.
After a bit of downtime to think about it, I had another look and then decided that maybe the posts had paint of something on them and a bit of strategic use of the Dremel® might clean them up. Turns out, yes, that was the problem, or part of the problem. The old springs were stuffed, so kept the new springs, returned them to the middle position and then is was a matter of adjusting the pads. Simple. Bwahahahahaha!
While, I have worked on some pretty weird and wonderful braking systems over the years, and have fitted and adjusted plenty of cantilever brakes, these were a bit of a mission. Part of the problem was these were fairly early in the evolution of cantilever brakes and partly because there was a lot of play where the pads were connected to the posts that were held by the cantilever arms. But, the real challenge was the fitting that held the post. It has an angled spacer system that allows you to adjust the the pads relative to the braking surface. Excellent. Except that all the wear over time meant that when I thought I had it in the right spot and start to tighten it up, the act of tightening it, changed the alignment, so I had to set it for where I thought the pad would end up after I’d tightened it – keeping in mind that I also have to set the opposite side and make sure they both start the same distance from the rim. And you thought disc brakes were hard!!! LOL.
So two days of fiddling with the front brake and it more or less works fine. But now I have a backlog of other stuff I should have done, so this will have to wait.
Meanwhile the derailleurs are soaking in Boeshield® in the hope that’ll all the bits will move freely when I get to them. Although, they have been there so long now that Boeshield crystals are starting to form on them and I really need to do something about that.
Meanwhile, running a bike shop got in the way of all of that and it was another few weeks before I could get the back brakes sorted out – after rescuing the derailleurs and cleaning most of the Boeshield curds off them!
The rear brake went a bit quicker now that I knew (more or less) what I was doing. In fact, in the end these turned out to work much better than the front brakes. So good actually, that I felt that I would be confident riding the bike with them, maybe not down a mountain, but certainly anywhere around town. And of course I then had to revisited the front brakes with my new-found expertise and pretty soon they were dialled in as well. Now, I would actually be happy to ride this most places. I don’t think I’d go to Duck Creek Mountain Bike Park, but mainly because I’m a roadie and I’d probably axe myself on a Stumpjumper, not to mention a 35 year old hardtail with old-school road bike geometry and no suspension at all!
I have to admit, I was pretty pleased with myself after the brakes and really all I had to do now was the gears. I was, perhaps foolishly, thinking that the end was in sight.
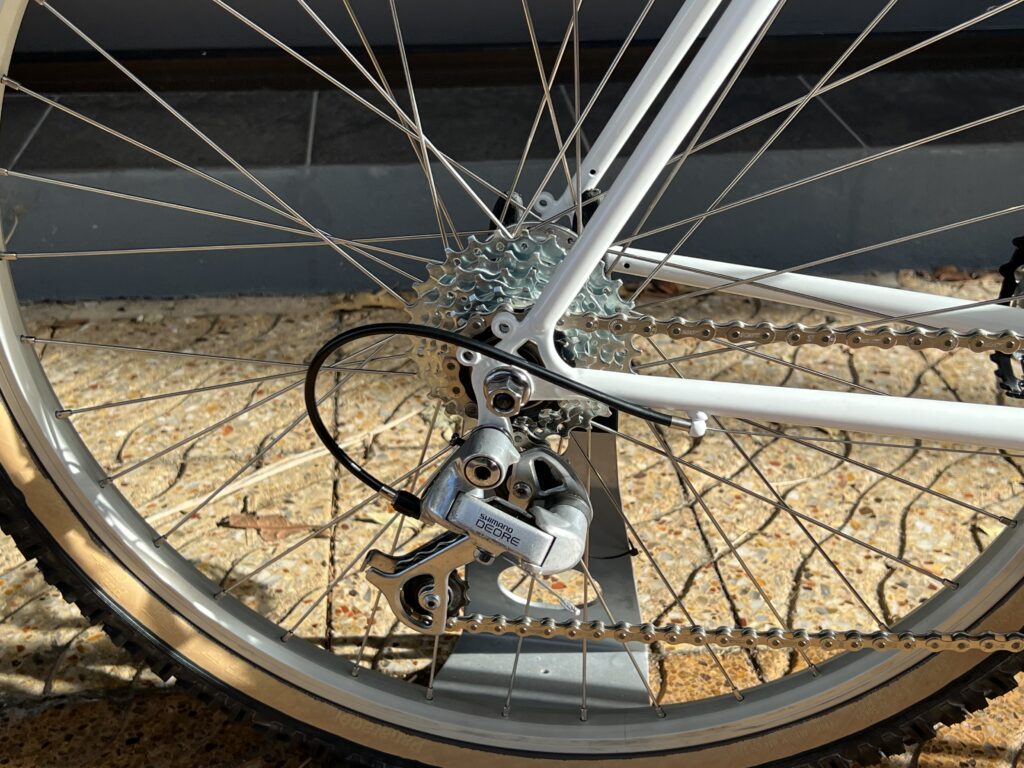
The rear derailleur wasn’t too much of an issue. I managed to pull it apart, clean it, polish it, grease it all and put it back together. Replaced the broken jockey wheels and a few crusty bolts with other parts from old Shimano derailleurs and it looked pretty good. Checked the hanger was straight (not something you would ever have done back in the day when they were all steel, but that’s how we roll now) and fitted the derailleur it to the frame. One down.
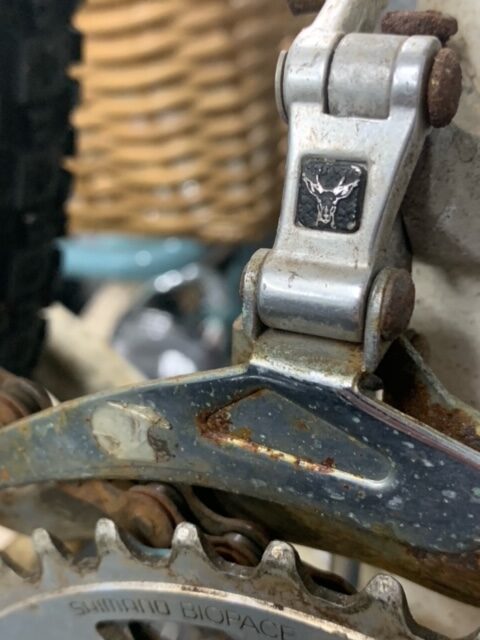
Front derailleur. Sad to say that the limit screws were so badly corroded in place that removing them was going to be more work than it was worth. Not-to-mention that the inside of the derailleur cage was very badly worn and corroded. Time for a new derailleur. Sadly, these had the Deore XT “Deerhead” emblem on them.
Onto the World Wide Web, again and again and again, nothing. We’re gonna have to settle for something the same era, but not the same model. I did manage to find something close in much better condition that cleaned up really well. That will have to do.
It was at about this point that I started to think I could see the light at the end of the tunnel (again). It’s that glass-half-full thing.
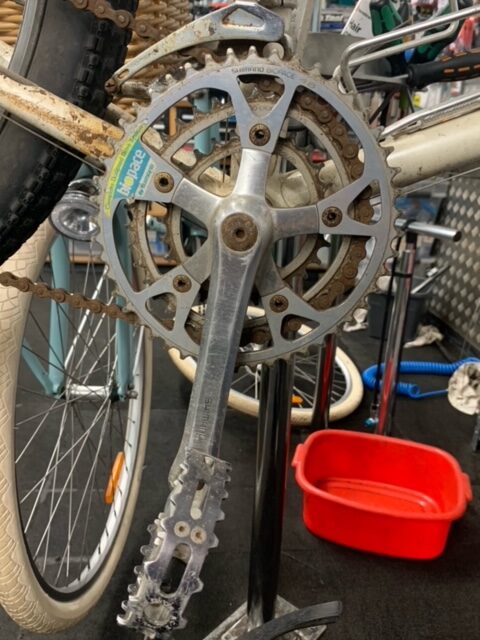
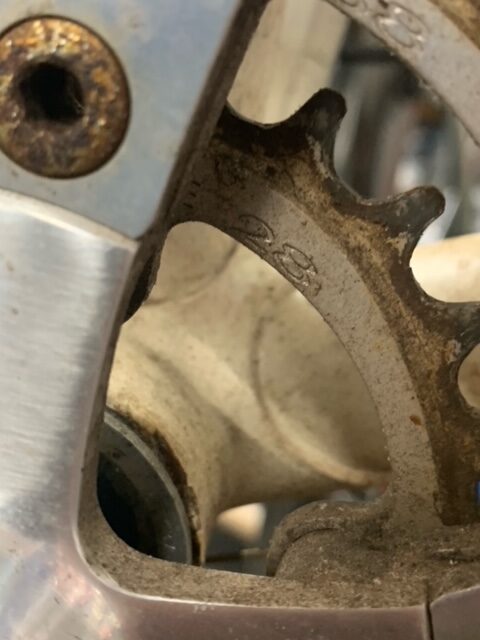
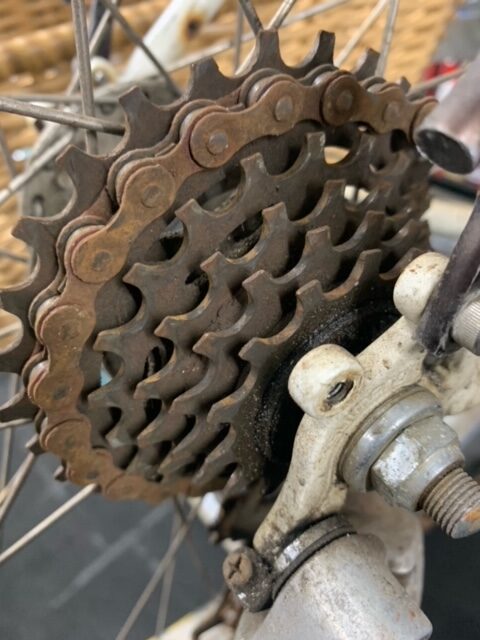
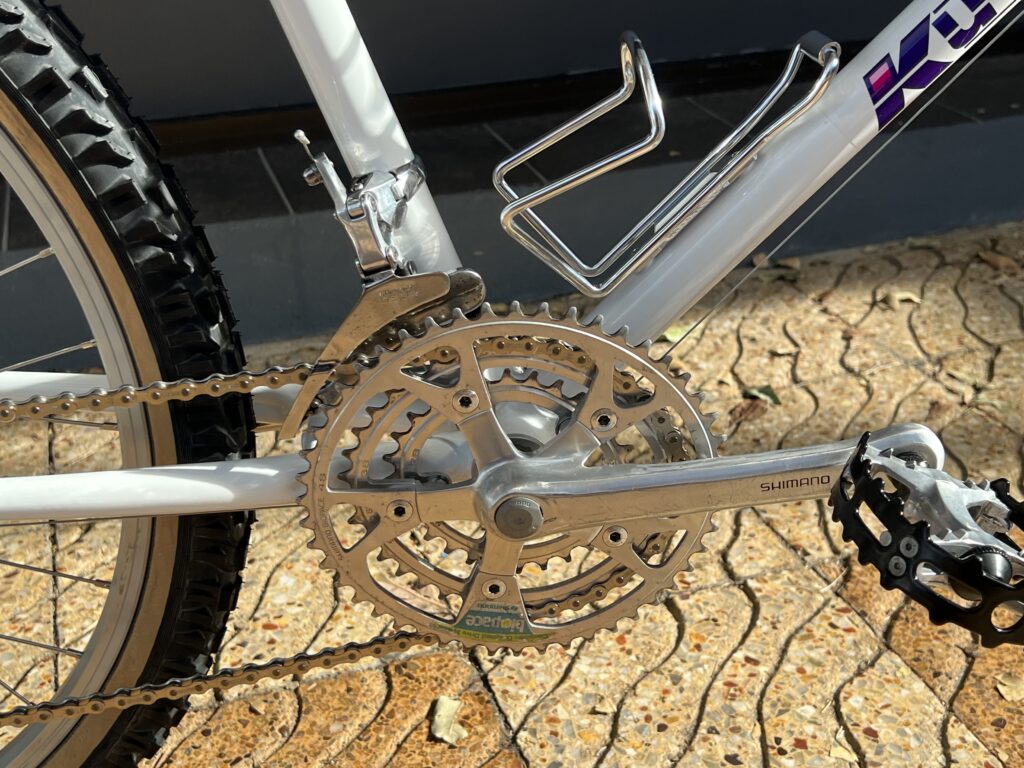
Well before I get too carried away, let’s whack the crankset back on. OK, let’s clean and polish the Shimano BioPace® crankset. Pull it apart, clean it, find some new chainring bolts, put it all back together. Make it look as good as you can without trashing the decal. Doable, but not quickly, but done and on the bike, New KMC chain with a stainless finish, new Sunrace freewheel cluster on the rear hub – the original Shimano one was fine after I serviced it, actually better than the Sunrace one, but the new Sunrace one is shiny. Everything else is shiny. Shiny it is.
That’s everything except the shifters. Like the stem and the brake levers, these are the bits you’ll be looking at the whole time you’re riding, so they have to look the business, but they also have to do a job; and if something’s worn out or broken, there’s no spares (I know, I looked). Of the whole bike, this is the bit I agonised over the most; an old Campagnolo Record downtube shifter from the 1970s, no problem. They’re not everywhere, but there are enough of them around that you’ll find one. A set of early MTB era thumb shifters? Good luck with that!
I carefully dissected each lever and laid out all the parts to be cleaned, polished, repaired, etc. They were quite intricate for what they were and I’m not surprised so few of them have survived. I imagine most bike shops would have ripped them off and stuffed on some rubbish Tourney trigger shifters first chance they got. So, we were pretty lucky to have the originals and I wasn’t going to be the one to stuff them up. I got them clean and back together, well mostly, there was one part that was broken, but the power of Superglue sorted that out. The real problem was the bolts that held each one together, They were mild steel, cheaply chromed and badly rusted. They were a nicely machined bolt with a bevelled head and a stainless steel clip across the top to tighten them with – like old downtube shifters. But they were too far gone to be re-used.
Since they looked so much like the bolts on down tube shifters with their little folder over tightening bail, I thought that maybe I could just use some of those. There I was with the mad optimism again. Nope, nothing fitted, nothing had the same diameter or thread pitch, not Shimano, Suntour or Campagnolo. Dammit.
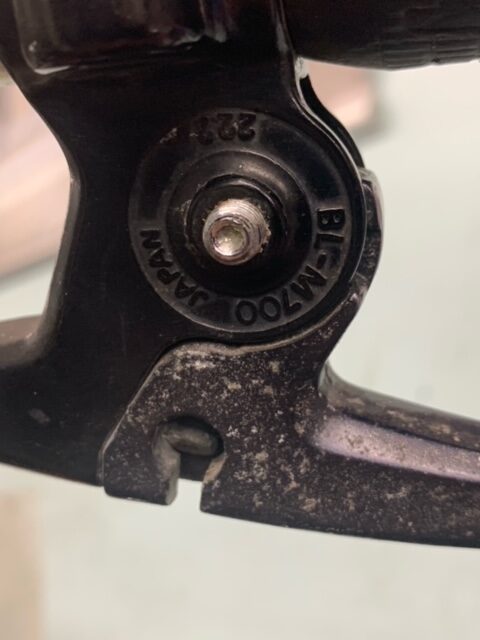
Well I managed to narrow it down to 4.5mm diameter, pitch uncertain. Well let’s go shopping, first stop, Bolt Barn, “No such thing.” Well, I know it’s a thing, I have one here in my hand. Turns out, nobody was able to supply a 4.5mm bolt in stainless steel – in any pitch. When all else fails … no, not AliExpress, good old Uncle Sam, the world’s manufacturing powerplant. “Yes sir, 4.5mm bolts, no problem, in stainless steel you say? No problem. What pitch would you like?” I’m not sure, what pitch have you got? “We have three different pitches.” Better send me all three, “No problem, minimum order quantity, box of 50.” Wait, what? “You want the bolts or not, Snowy?” (He didn’t actually call me Snowy, but most of my American friends did, and well, you know, I half expected him to). Short story, 150 x 4.5mm bolts later, we had a solution. No stainless steel bail, and a Torx head – soooo not period correct! But, we have the a pair of clean, shiny, working late 1980s Deore XT M700 “Dearhead” thumb-shifters on the bike and we can change gears – reliably.
And I have a lifetime’s supply of 4.5mm stainless steel bolts.
And, we also have a working bike.
Well almost. Pair of Deity Knuckleduster grips – gave up trying to find anything even half decent from the right era. I have no idea what they were using. Very limited data. Pretty sure nothing back then was a lock-on, but ….. we had to make some compromises.
Now there was only one bit missing. Pedals.
A classic pair of Suntour beartraps; they looked pretty rough and I hadn’t given them much thought. I was in half a mind, to just stick some new reproduction pedals on the bike at this point, or maybe even from the start, which is probably why I hadn’t given them much consideration. But then I had a close look at them.
This is always my problem. When I realise that they are actually a well made quality component, I have no choice but to try and save them and make them back to what they were. So, I pulled them apart, took the cages off and sent them to get powdercoated – figured that would be robust enough that it wouldn’t rub off after the first ride – at the risk of coming back too fat to put back together.
Then I dismantled the rest of the pedals, took out the axle, removed the bearings, cleaned out all the lumpy dried up grease and set to polishing the heck out of those puppies. Who knew polishing pedals could be so satisfying … or time-consuming. Fortunately, Rick at Vivid Powdercoating was snowed under and by the time he managed to fit in the pedal cages, I was about ready to put them back together. They went together disconcertingly easily and onto the bike and it’s ready to ride.
And just like that, it was all over.
Wow.
After being immersed in the project for so long, to finally reach the end was a bit strange. Nothing had really prepared me for this; when I finished my PhD, there were still papers to write and more research to do and a career and so on, but this is it. Finished. Andrew will give me some money and take his bike home and I might never see it again. I’m not sure how I feel about that.
I mean, I feel OK, and I’m happy with how it turned out. Actually, I’m really happy with how it turned out as it had so much potential to turn south. So, I’m satisfied. And I like looking at it now that it’s done and hanging in the picture frame in pride-of-place in the shop. Even as a roadie, I have to say, I’ve taken quite a shine to it!


As one of our customers commented, “It looks like it’s never been ridden!”
What do you think?
Kuwahara History & Links
Kuwahara is a Japanese bicycle manufacturer founded in 1918. In the late 1960s they started making bikes for North American brands like Schwinn and by the early 1970s were selling their own branded BMX bikes into north America and quickly established themselves in the market with some great local marketing, including the movie E.T.
Unlike many of their competitors, like Fuji, Kuwahara saw the opportunity that was mountain biking and by 1980 had released their first mountain bikes into the Canadian and Australian markets.
Kuwahara continues to manufacture bicycles under their own name Kuwahara Bikeworks Japan, and they continue to make primarily BMX and mountain bikes and parts.
Leave a Reply
You must be logged in to post a comment.